In this post, we will see how we can use honeypots to connect to unassuming clients.
I am assuming here that we dont have an AP which we can set up as we want. All we have is a laptop, any atheros based wireless card and backtrack. Though these simple things i m going to explain here would work well with most of the backtrack versions, i am using BT3. BT4 -beta too has been released and i will move to that soon.
So, we can have our wireless card in four modes:
1.Monitor mode: This is the mode in which our card listens to the wireless traffic.
2.AP mode: In this mode, wireless card acts as an access point.
3.Managed Mode: Also known as station mode, card acts as a wireless client.
4.Ad-Hoc Mode: We can make wireless card to work in ad-hoc mode.
For honeypot we will put our card in AP mode. Assuming we are using madwifi-driver, this is how we can set up a honeypot.
 Explanation :
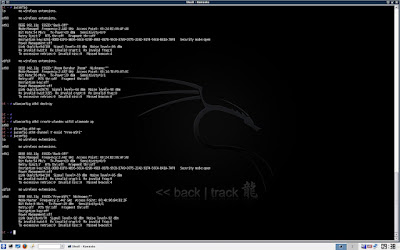
- The first command "iwconfig" shows all wireless interfaces in the machine. In this case, these are "eth1" and "ath0". Both are in managed mode so connected to different networks, "Back-Off" and "Jhoom Barabar Jhoom" respectively. ath0 is atheros chipset based wireless card.
- As we have to put atheros card in AP mode, we first destroy that using "wlanconfig ath0 destroy".
- Then we create a new interface in AP mode.
- Then we set the channel (i.e. 7) and essid of AP ( Free-WiFi).
Now our wireless interface ath0 will be seen as an open AP. To have layer 3 connectivity with the client, we can start dhcp server also.
Create a dhcpd.conf file like this:
ddns-update-style ad-hoc;
subnet 192.168.1.0 netmask 255.255.255.0 {
option subnet-mask 255.255.255.0;
option broadcast-address 192.168.1.255;
option routers 192.168.1.1;
option domain-name-servers 192.168.1.1;
option domain-name "google.com";
range dynamic-bootp 192.168.1.7 192.168.1.49;
default-lease-time 21600;
max-lease-time 43200;
}
Create a rc.dhcpd:
#!/bin/sh
# /etc/rc.d/rc.dhcpd
dhcpd_start() {
if [ -x /usr/sbin/dhcpd -a -r /etc/dhcpd.conf ]; then
echo "Starting Dhcp..."
/usr/sbin/dhcpd -cf /etc/dhcpd.conf ath0
fi
}
dhcpd_stop() {
killall dhcpd
}
dhcpd_restart() {
dhcpd_stop
sleep 2
dhcpd_start
}
case "$1" in
'start')
dhcpd_start
;;
'stop')
dhcpd_stop
;;
'restart')
dhcpd_restart
;;
*)
# Default is "start", for backwards compatibility with previous
dhcpd_start
esac
To start dhcp server on BT3, follow these steps:
#mkdir /var/state/dhcp (create only if it does not exist)
#echo " " > /var/state/dhcp/dhcpd.leases
#cp dhcpd.conf /etc/
#cp rc.dhcpd /etc/
#chmod 755 /etc/rc.dhcpd
#/usr/sbin/dhcpd -cf /etc/dhcpd.conf
Now the connecting client will also get IP address from attacker's machine. What else can be done from here onwards, we will see in the next posts.

No comments:
Post a Comment